Find the Best Garbage Disposal Service Companies for Your Business
No obligation • Fast responses • Nationwide coverage
Why you can trust Search a Plumber
Search a Plumber is a leading United States resource for finding and evaluating professional plumbing services. Our team researches licensing, experience, and customer feedback to create unbiased, fact-driven overviews. Companies cannot pay to change ratings or placement, ensuring homeowners get trustworthy information.
Search providers near you
Top Garbage Disposal Service Companies in Franklin, Tennessee Ranked
A functional garbage disposal is a cornerstone of a modern, efficient kitchen, quickly handling food scraps and reducing waste. When your disposal malfunctions or you're upgrading your sink, professional repair or installation ensures the job is done safely and correctly, preventing leaks, electrical issues, and future clogs. This guide provides detailed information on what to expect with disposal services in Franklin, helping you understand the process, costs, and how to find qualified local specialists for your project.

All Pipes, LLC
325 S 14th St, Nashville, TN 37206
All Pipes, LLC is a plumbing company based in Nashville, TN, offering a wide range of services including water heater repair, tankless water heater plumbing, water softener installation, drain cleaning, sewer line repair, leak detection, repiping, toilet repair, and garbage disposal repair. They serve residential and commercial customers throughout Nashville with expertise in handling plumbing challenges common to older homes as well as modern systems. The company is known for its skilled team and quality workmanship, emphasizing safety and customer communication. Founded by local plumbers Robert Smith and Jay Santangelo, All Pipes has built a reputation for reliable and knowledgeable service in the Nashville area.

Hiller Plumbing, Heating, Cooling & Electrical
1920 TN-46, Dickson, TN 37055
Hiller Plumbing, Heating, Cooling & Electrical serves the Nashville, TN area, offering a wide range of plumbing and HVAC services. Their expertise includes water heater repair and installation, drain cleaning, leak detection, repiping, toilet and garbage disposal repair, as well as electrical and heating and cooling solutions. The company is known for addressing the root causes of issues rather than temporary fixes. They also provide generator installation and maintenance. Customers have noted their professionalism and thorough approach, with some technicians recognized for their knowledge and customer care. Hiller Plumbing, Heating, Cooling & Electrical offers after-hours emergency service, ensuring support when needed most.

The Rooter Dude
311 Cobblestone Landing, Mt. Juliet, TN 37122
The Rooter Dude is a plumbing service provider based in Nashville, TN, serving Middle Tennessee with both commercial and residential plumbing solutions. Established in 2003, the company offers a wide range of services including drain cleaning, sewer camera inspections, trenchless sewer repair, hydro jetting, leak detection, and repairs for toilets and garbage disposals. They provide 24/7 emergency plumbing services to address urgent issues promptly. The Rooter Dude is licensed, bonded, and insured, ensuring work is completed up to code with precision and efficiency.

Armor Air TN
319 W McKnight Dr #8, Murfreesboro, TN 37129
Armor Air TN is a locally owned company providing HVAC and plumbing services in Nashville, TN. They offer a range of plumbing solutions including water heater repair and installation, water softener installation, sump pump repair, drain cleaning, sewer line repair, leak detection, toilet repair, and garbage disposal repair. Their team is experienced in handling various plumbing and HVAC needs, with capabilities including emergency HVAC services and comprehensive plumbing repairs. Armor Air TN serves the Murfreesboro metropolitan area and surrounding communities, focusing on delivering quality repairs and installations. They also offer a Shield Protection Plan to help maintain HVAC equipment efficiency.
Angle Stop Plumbing, Inc.
2222 General Raines Dr, Murfreesboro, TN 37129
Angle Stop Plumbing, Inc. is a veteran-owned plumbing company serving Nashville, TN, with over 31 years of experience. They provide a wide range of plumbing services including water heater repair and installation, drain cleaning, sewer line repair, leak detection, repiping, and water softener installation. The company is known for using quality products from trusted brands and offers 24/7 emergency plumbing services. Their skilled technicians are fully certified and licensed, ensuring professional workmanship backed by a one-year warranty.
Understanding Garbage Disposal Services
Garbage disposal services typically fall into two main categories: repair and installation. Repair involves diagnosing and fixing issues like jams, leaks, strange noises, or a complete failure to turn on. Common repairs include freeing a jammed impeller, replacing worn seals, or fixing electrical connections. Installation encompasses removing an old, broken unit and fitting a new one, which includes securing it to the sink, connecting plumbing drains, and wiring it to your home's electrical system. For kitchens with a dishwasher, this also involves connecting the dishwasher drain hose to the disposal's inlet port.
Whether you need a quick fix or a full replacement, understanding the scope of work helps you communicate effectively with service providers and get accurate estimates for the job.
Key Considerations Before You Begin
Before scheduling a service call or purchasing a new unit, a few key assessments can streamline the process.
- Assess the Problem: Is your disposal completely dead, leaking, humming but not spinning, or just slow? A simple reset with the button on the unit's bottom or using an Allen wrench to manually turn the impeller can sometimes fix a jam. If these steps don't work, professional diagnosis is needed.
- Check Available Space: Open your under-sink cabinet and measure the available space. Newer or higher-horsepower disposals can be larger. Ensuring there's enough vertical and horizontal clearance is crucial for a proper fit.
- Dishwasher Connection: If your dishwasher drains through the disposal, you'll need a model with a dishwasher inlet. The installer will need to "knock out" a small plug inside this inlet to allow the dishwasher hose to connect.
- Existing Plumbing: Examine the current drain setup. The installer may need to adjust or replace the P-trap and tailpiece to align with the new disposal's outlet, which is a standard part of the installation process 1.
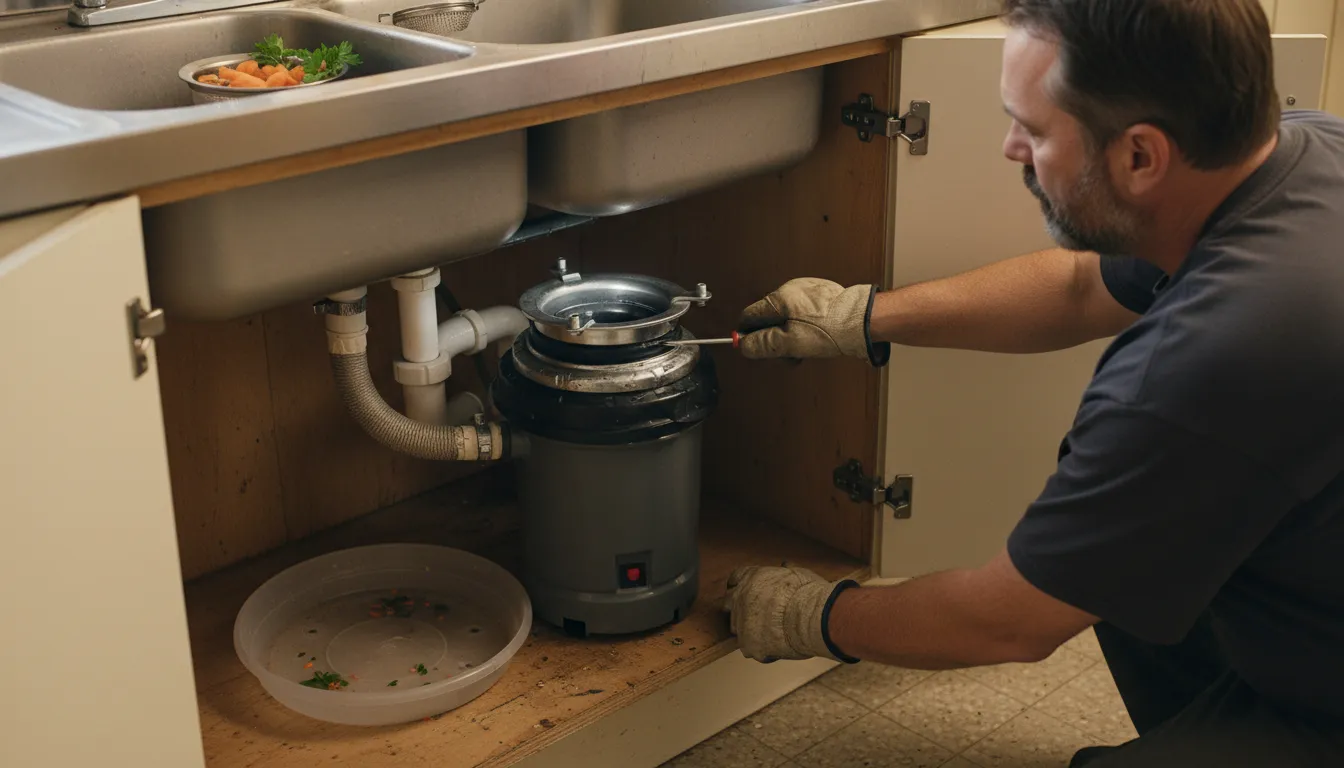
The Professional Installation Process Explained
A professional installation follows a systematic approach to ensure safety and longevity. Here's a breakdown of what a skilled technician will do:
- Preparation & Safety: The technician will start by shutting off the circuit breaker powering the disposal and the cold water supply line under the sink. This is the most critical safety step.
- Removal of the Old Unit: They will disconnect the drain pipes and dishwasher hose (if present), then detach the electrical wiring. The old mounting assembly is loosened from beneath the sink, allowing the old disposal to be removed. The sink flange area is then thoroughly cleaned.
- Mounting the New Sink Flange: A bead of plumber's putty is applied under the rim of the new sink flange, which is then pressed into the drain hole from above. From below, a mounting ring and gasket are tightened, creating a watertight seal at the sink.
- Connecting the Disposal Unit: The new disposal is aligned with the mounting assembly and twisted into a locked position. The technician will then connect the dishwasher hose to the inlet (after removing the knockout plug) and rewire the unit, matching black to black, white to white, and grounding wires 2 3.
- Reconnecting the Plumbing: The drain tailpiece and P-trap are reconnected to the disposal's outlet. All connections are checked and tightened.
- Final Testing: Power and water are restored. The disposal is run with cold water flowing to check for leaks and ensure it operates smoothly and quietly.
Choosing the Right Garbage Disposal
Selecting a new unit involves more than just brand. Key specifications impact performance and compatibility.
- Horsepower (HP): This indicates grinding power. A 1/2 HP motor is common and sufficient for most average households. For heavier use or families that frequently process tougher scraps, a 3/4 HP model offers more power. For demanding kitchens or the quietest operation, 1 HP disposals are the top tier.
- Grind Chamber and Components: Look for stainless steel grind components for durability and corrosion resistance. Some models feature anti-jamming technology or sound insulation.
- Sink Compatibility: Ensure the unit fits a standard sink drain hole, which is typically 3.5 to 4 inches in diameter 4.
- Warranty: A longer warranty often reflects the manufacturer's confidence in the unit's durability.
Find the perfect garbage disposal service companies for your needs
Get personalized recommendations and expert advice
Cost Breakdown for Franklin Homeowners
Understanding the cost components helps in budgeting for your disposal project. The total price typically includes the unit itself and professional labor.
- Unit Cost: A basic 1/2 HP disposal can start around $80. Mid-range 3/4 HP models with better features range from $100 to $150. High-end, quiet 1 HP units can cost $200 or more.
- Professional Installation Labor: For a straightforward replacement where the new unit is a direct swap for the old, installation labor in Franklin can range from $100 to $200 5 6. This assumes you provide the disposal and all necessary electrical connections are already in place.
- Total Project Cost: Therefore, for a standard replacement, Franklin homeowners can expect a total cost (unit + professional installation) in the range of $200 to $400+ 7 8.
- Additional Cost Factors: The price can increase if the job is more complex. This includes installing a disposal where one never existed (requiring new electrical wiring and plumbing), dealing with corroded or difficult-to-remove old parts, or if significant adjustments to the cabinetry or plumbing are needed.
When to Repair vs. When to Replace
Not every disposal problem requires a brand-new unit. Here's a quick guide to help decide.
Consider Repair If:
- The unit is relatively new (under 5 years old).
- The issue is a simple jam that can't be manually cleared.
- There is a small leak from a resealable connection.
- A specific, replaceable part like a reset button or seal has failed.
Consider Replacement If:
- The disposal is over 10 years old (repairs may be less cost-effective).
- The motor has burned out or the unit has major internal damage.
- It's leaking from the main housing or grinding chamber.
- You're remodeling your kitchen or want to upgrade to a quieter, more powerful model.
Maintaining Your Garbage Disposal
Proper maintenance extends the life of your unit and prevents common issues.
- Run with Cold Water: Always use a strong stream of cold water before, during, and for about 30 seconds after grinding. Cold water solidifies grease, allowing it to be chopped up and flushed through, whereas hot water can melt it and cause clogs further down the drain.
- Avoid Certain Items: Never put fibrous materials (celery, corn husks), expandable foods (pasta, rice), grease/oils, coffee grounds, or non-food items down the disposal.
- Clean Regularly: Periodically grind a few ice cubes to help scour the grind chamber. You can also use a combination of baking soda and vinegar followed by cold water to deodorize.
- Use It Frequently: Running your disposal regularly helps prevent corrosion and keeps parts moving freely.
Frequently asked questions
Sources
Footnotes
-
How to Prepare for Garbage Disposal Installation From a Plumbing ... - https://www.rapidplumbing.net/how-to-prepare-for-garbage-disposal-installation-from-a-plumbing-company ↩
-
How To Install a Garbage Disposal in 6 Easy Steps - Lowe's - https://www.lowes.com/n/how-to/install-a-garbage-disposal ↩
-
How To Install a Garbage Disposer | Menards - https://www.youtube.com/watch?v=pYKXGDBxx_k&t=109 ↩
-
Step-by-Step Guide to Installing a Garbage Disposal (And ... - https://inletfl.com/step-by-step-guide-to-installing-a-garbage-disposal-and-when-to-call-a-pro/ ↩
-
Garbage Disposal Installation - Benjamin Franklin Plumbing - https://www.benjaminfranklinplumbing.com/services/garbage-disposals/garbage-disposal-installation/ ↩
-
Garbage Disposal Installation Cost Guide - The Home Depot - https://www.homedepot.com/services/c/cost-install-garbage-disposal/357654922 ↩
-
2026 Garbage Disposal Installation Cost - HomeGuide - https://homeguide.com/costs/garbage-disposal-installation-cost ↩
-
How Much Does it Cost to Replace a Garbage Disposal? - https://www.thespruce.com/how-much-does-it-cost-to-replace-a-garbage-disposal-7094442 ↩